
The Logbook function is used for digital event recording and fully replaces the physical logbook at the facility.
The system allows you to:
- Record all incidents, extraordinary events, regular reports, or service tasks.
- Link related events to ensure clear continuity throughout their resolution.
- Effectively manage the entire process of handling individual events.
Possibility of integration with other functions:
- Forms
- Notifications
Further information regarding these functions is mentioned later in the manual.
The Logbook can be accessed and managed via:
- Web application (on a computer): Complete management, creating event types, editing links, filtering, and closing incidents.
Limitations in the TOUCHGUARD mobile app: Direct logbook management (viewing history or closing events) is not available in the mobile app. Nevertheless, field workers can use it to send important data to the Logbook by completing designated forms.
How to link the mobile app with the Logbook:
- The field worker fills out the relevant form on a mobile device Form (e.g., Damage Report ).
- They save this form, thereby sending it to the system.
- An administrator in the web interface can easily attach this completed form within 24 hours as an attachment to any event created in the Logbook.
1. SYSTEM SETTINGS FOR WORKING WITH THE LOGBOOK
Before you start actively using the Logbook function, it is necessary to:
- Define the types of log entries (1.1) that will be recorded at your facility.
- Set permissions for individual users (1.2).
1.1 Creating log record types
Event types are used to categorize records (e.g. Technical fault, Regular check, etc.). With the correct settings, you can filter and evaluate the data in the logbook efficiently later.
Setup procedure:
- Click on the gear icon in the top right corner (Location Settings).
- Click on the tab Diary.
- In this section you can see a list of the current record types:
- You can edit the names of existing sample records by clicking in the text box or by clicking the create a new custom event type. When you are finished, press the Save button.
- The event types are completely arbitrary and can be adapted to the specific needs of the object.

1.2 Setting user permissions for working with the Diary
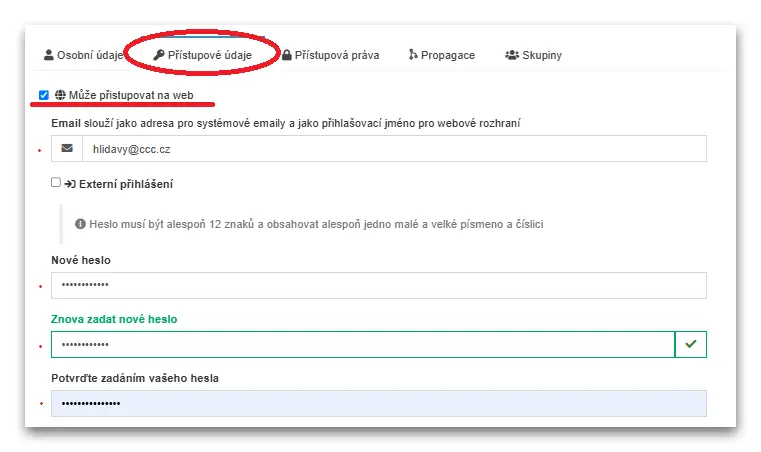
To work with the Diary, it is necessary that the user has web access enabled in the application and the appropriate access rights assigned. This will ensure that the user only sees the functions that he actually needs to do his job.
To set up the web access option:
- In the main menu (on the left side of the screen), go to the Users - Users section.
- For the selected user, click the edit button .
- Select a tab Access data.
- Check the option Can access the web.
- Enter the user's email into the text field.
- Enter the user's new password.
- Confirm the changes with your own administrator password.
How to set access rights for an individual:
- In the main menu, go to the section Users - Users.
- For the selected user, click the edit button .
- Select a tab Access rights.
- Scroll down to find the Diary section.
- Select the individual check boxes to define the user's permissions when working with the function Journal.
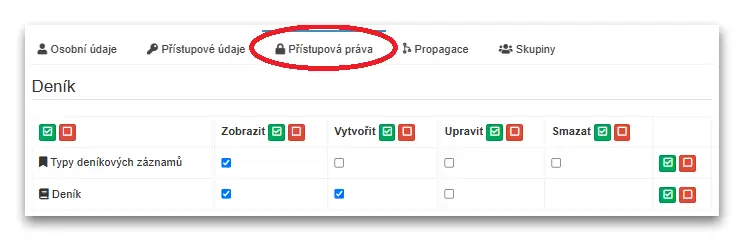
Other (unchecked) permissions should be held only by the application administrator.
If you are interested in setting permissions for a group of users, please refer to the separate Users manual. CREATE LINK
2. CREATE A NEW EVENT IN THE JOURNAL
- To open a function, select a function from the basic menu on the left side of the screen. Diary.
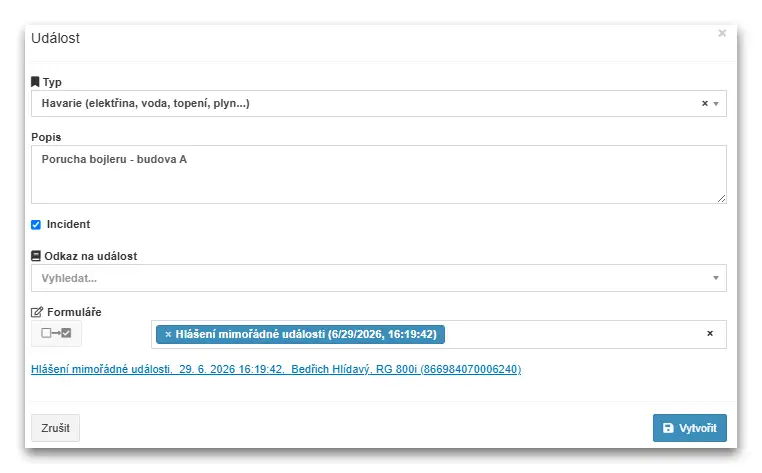
- To create an event, click the add button button to add a new event.
- Type: select the event type from the drop-down menu (the categories you defined in step 1.1 will be displayed here).
- Description. We recommend that you include all relevant circumstances.
- Incident: if you consider the incident to be serious, you can check the Incident box. This will make it easier to filter for critical conditions later.
- Event link: you can link an event to a previous event record (e.g. fault report -> repairman arrival), link them here to maintain continuity.
- Forms: If a related form has been completed on the mobile terminal in the last 24 hours form, you can now attach it to the event (e.g. you may have created an Incident form for emergencies to attach to the event).
- Save: Complete the process by clicking the button Create.


3. EDITING AND EVENT HISTORY
In function The diary applies the rule of immutability of history. This means that records already created and saved cannot be modified or deleted retroactively. This ensures the integrity of the logbook.
How to deal with more complex events?
If an event has multiple steps or requires additional records, the original event is not modified, but a new event is created and linked to the original event.
Linking procedure:
- Create a new event (see Chapter 2).
- In the Link to event window, select the original event you wish to follow up on (see example).
Example:
- Entry no. 1: You have created an event named "Boiler failure - building A".
- Entry no. 2: You want to record the arrival of the technician. You create a new event with the description "Plumber started repair" and in the field Link to the event to connect it to record no. 1.
In this way, a logical chain of related events is created in the overview, which maps the entire course of the situation.
INSERT VIDEO HERE - Editing an event with bubbles
4. EVENT COMPLETION
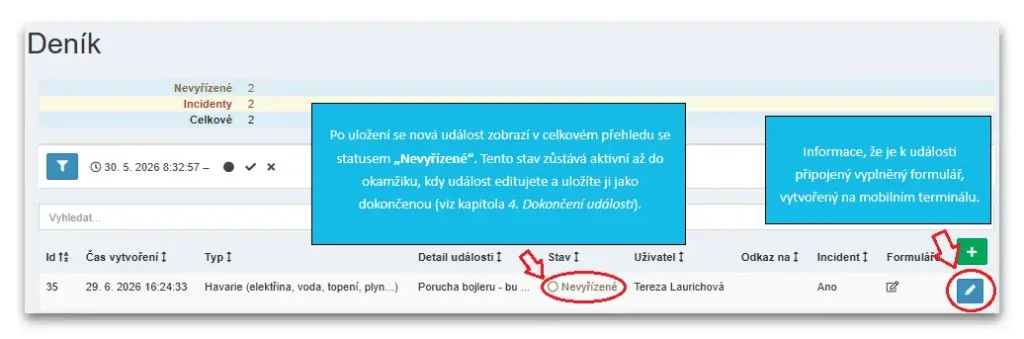
The moment the reported event is resolved, the TG must formally close the event. This will change its status from "Pending" to "Completed".
Event termination procedure:
- Selecting an event: in the diary overview, locate the event you want to end and click the edit button
 .
. - End event: select the "Finish" button at the bottom of the screen .
- Final report: in the description window that appears, write how the event was resolved.
- Confirmation: click on the button
 Finish.
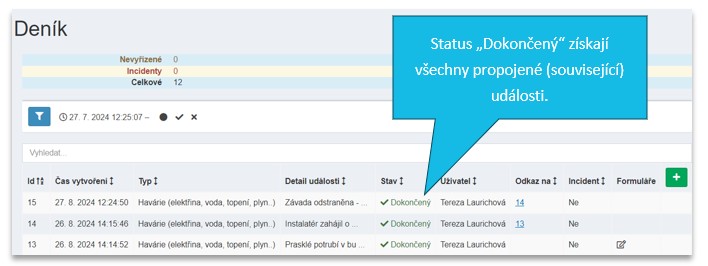
- All linked (related) events in the chain will automatically get the status "Completed".

- Event cancellation: if the event was a false alarm or if the specified event was not confirmed, select the Delete button.
 .
. Finish.
5. EVENT FILTERS
To work efficiently with a large number of records, the Diary module offers advanced filtering tools. For example, you can view only the issues currently being resolved or the events of a specific employee.

Available filtering parameters:
- By event type: filtering by the categories you define (e.g. display only Special events).
- By User: Search for records that a specific user (record author or solver) has worked with.
- By condition: Allows you to view only pending, completed or crossed out events (Ideal for a quick overview of current tasks).
- Time period: limiting the listing to events occurring in a specific time period from - to.
- By Incident Flag: Allows you to quickly filter out only records that have been flagged as an incident or, conversely, normal operational records.
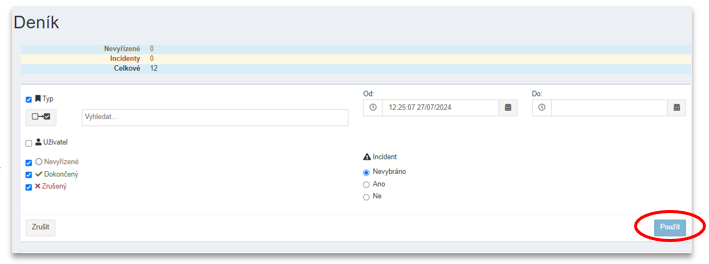
After defining the filter options , click the "Apply" button.
By combining filters (e.g., Status: Pending + Type: Incident), you get an immediate overview of the most critical situations requiring your attention.
6 LOG HISTORY REPORTS
6.1 Records
The history of all log entries can be found in the main menu under Record. This section provides a complete overview of the activities in TOUCHGUARD. To view specific events, use the
Filter  . Click on the row of the selected record to view its detailed information. Buttons are available at the bottom of the screen to export the report to PDF and CSV formats.
7. NOTIFICATIONS
Feature The diary can be linked within the app to another feature that extends the control and information possibilities:
- Upozornění: Díky tomuto nastavení vás systém informuje o vybraných událostech (např. e-mailem nebo v sekci Přehled). Mezi nejčastěji využívané scénáře patří:
- Event: the system will alert you when a new event is created in the journal.
- Closure: You will receive a message when a worker closes an existing event.
Detailed information on configuration options can be found in the separate Notifications manual. CREATE LINK
8. FINAL RECOMMENDATIONS
After all parameters are completely set, save the changes by clicking the button Save.
8.1 Synchronisation of the mobile terminal
All system changes will only take effect in the mobile app after the next synchronization. We recommend synchronizing mobile terminals regularly to ensure the data in the app is always up to date.
Synchronization normally occurs when the user logs out of the app on the mobile terminal using the Log Out button and subsequently logs in again. If the changes still do not appear in the app, the user must follow this procedure:
- Log out of the TG app (if currently logged in).
- Click on the three dots icon in the top right corner.
- Select the "Reset" option .
- After the recovery is complete, log back into the application.
8.2 Application version update
Furthermore, we recommend regularly checking the app version on mobile terminals. If the version is not up to date, an update is necessary for the system to function correctly.
Note on Knox mode: This update does not apply to devices operating in Knox mode, where the application is managed centrally.
More detailed information on the update procedure can be found in the separate Mobile Terminals manual. CREATE LINK